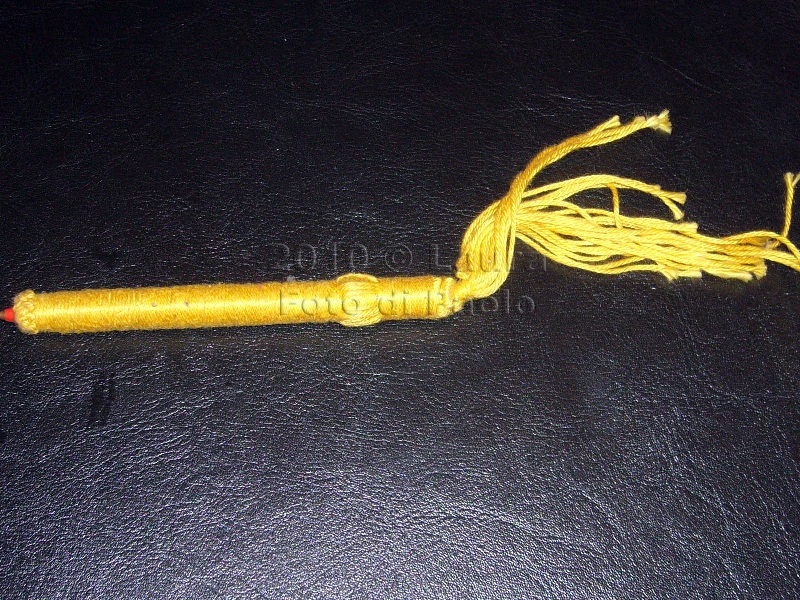
Biro covered with purple macramé bracelet name Both time ago who was the military, to spend their free time, covered the Bic pen with the yarn, and while he held, he wrote his name.
I searched and searched online but I could not find anything.
I did so but then a soldier told me that they were made differently.
Someone knows more and can help me? I would love to see them.
I put the yarn form the name on the pen horizontally.
Iil purple wire is coiled around the pen and every so often stuck with PVA glue.
to form the letters I have spent the wires above the purple lilac and pink.
I used a pen long only 11 cm (including the cap) of the blog
Flavia "Flavia
: my magical world " has found a pen that made her boyfriend in the military.
Look how beautiful! You can see it here
. My
.... it is another thing.
Update November 28, 2010
A new friend, Paul, knows how to make the pen covered and is trying to teach me. I'm so glad!
Thanks Paul, I am well aware that it is easy to explain in writing but I promise to apply.
Paste here what he wrote in a comment that I have not posted because there was also its e-mail.
"Hello you all are Paul to start the thread that you have to use this kind is waxed silk http://atelierdart.forumcommunity.net/?t=32787029 scroll down until you find the thread. hours I'll explain how I can do: No. 1 pick a bic pen No. 2 pick up the thread of what goes under that basis, the measure must be the length of the pen more freely length of the plume, taking double this length and cut it all, just as many threads are enough to fill the pen (considered to be folded). No. 3 to know how many do you need to begin to experiment and make this modo:devi prendere il filo che arrotoli fuori ovviamente di un colore diverso dalla base, prendi la bic gli togli l'anima dentro cioè la cartuccia, il tubicino quando è vuoto ci metti dentro 10 cm di filo quello che devi arrotolare, rimetti dentro la cartuccia quindi avrai la bic con un filo che esce dalla punta. Premetto che noi che abbiamo fatto il militare ci ingegnavamo nel modo migliore per questo passaggio che ti sto spiegando perchè se non fai bene l'inizio la penna ti si srotola, io personalmente mettevo la penna bic dritta per verticale e la scocciavo con lo scotc ad un lato della sedia o della branda ed all'atro lato ci legavo il filo quello che ci devi girare intorno alla penna praticamente mi veniva like a taut wire cloths (I hope I explained myself. No. 4 this step easy although you have to be precise, you have to do with the threads of cappiole base spread around the wire pen that is right and the left as you thread the explain the cappiola? take one of the wires before you fold it in half cut the front edge lying hills and passes under the two ends around the wire stretched and steps in the folding of the flaps and pull the wire is cappiola made. you get them very good tight rope that is otherwise not good at the beginning of the pen. I do them a little closer on the side of the pen and if the calculations are sufficient to cover all in less no more, the better because it is badly named. Now I salute you if you let me know if I was clear continuation otherwise I will stop. Hello soon Paul "Paul this far I think I understand.
The yarn used is that of fuchsia silk
? But I do not understand why they call it waxed.
The cappiola could be that a number of photos in this page
?
If I can do tomorrow to try and explain where you put the picture.
Thanks
Update November 30, 2010
Paul was very kind and I ha mandato le foto. Guardate come sono belle queste penne.
Questa è stata fatta da Paolo nel 1991
Questa invece è stata fatta da Paolo 24 anni fa. Bellissima!
Paul has done today to show me. He wrote that the yarn is not suitable because it will unravel, but it was the only yarn that she had at home.
Update 1 December 2010
reached the point where we did all cappiole and we made enough to cover the entire pen (Abundo Melius quam in deficit ( Better abound that scarce)) begins the beautiful, from this point on the pen comes to life you can sbirrarrire starting with stripes in a color and then another, shredding a abbombatura see photos all around the green with 91 written these variants are to adorn the pen. CLARIFICATION In an earlier e-mail Laura asked me how to make different colors, to make that kind of play of colors must go back one step, when making cappiole among the wireless base we bring the various threads of a different color BUT YOU MUST DO THESE WIRES BUT VERY MUCH 'LUNGHI.perchè when then they would not have the coil in the pen long enough. (consider that at least 10/12 near and wires are all the same color that will be used for writing) indicated this what are you going to color them you please continue with the winding and the pen with the writing. Now you have the pen with the wire stuck in it for about 10 cm with the wire around the spool and all cappiole strung properly so that cover everything for the same reason that you had to engineer to make things for myself I continue in this way: take the spool of wire unrolling about two feet from the pen position to the center of a chair and you sit on the wire that passes through your legs, take the pen cappiole with all that you'll find it at the knees, the wire must be shot otherwise the part that holds the pen will be slow e quindi non viene bene. A questo punto cominci a girare la penna ed avrai le cappiole che coprono la penna il filo in tiro teso sotto il sedere la penna altezza ginocchia. comincia a girare e vedrai che la penna prende vita. puoi alternare i vari colori dei fili (avendo l'accortezza di mandare sotto li filo del rocchetto e tirare fuori il filo di diverso colore, gira a questo punto il filo che hai preso da sotto per un pò e poi ritiri fuori in filo iniziale e rimetti sotto quello di diverso colore, continua ad arrotolare la penna ,quando ti finisce il filo del rocchetto srotolalo un pochino e prosegui. Siamo arrivati al name, now you'll find the pen that we have rolled up a couple of inches of floss, let's pretend that you do L and suppose that as the size of letter you want to use about 10 wires, then take 10 leads them stand up and do it under 2 / 3 revolutions of the spool of thread, lowers the first 7 from above and so will remain outside the 3-wire 7 are back in their place, do about 5 / 6 turns of thread spool then lower the 3 wires that were left out do the other two three turns of thread spool quard the pen and at this point must have appeared the letter L. for the rest of the letters the same thing. Fai in modo che il filo che giri sia sempre in tiro. Prosegui fino a fine nome. Paolo, le spiegazioni mi sembrano chiare. Continuo con la mia prova. Grazie
Aggiornamento del 2 dicembre 2010
Buona sera a tutti Voi sono Paolo
proseguo con la fine della spiegazione della penna.
Una volta scritto il nome,uno può scegliere di abbellire con qualche decoro di colore differente il resto della penna.
Arrivati a circa tre o quattro giri prima della FINE della penna bisogna cominciare a fare la chiusura e pure questa operazione va fatta sempre con il filo in tiro altrimenti i nodini finali non vengono bene.
A Now we find the pen covered with up to three or four laps from the end, all the wires underneath close fitting with no gaps, that you should not see the plastic of the pen, you must now begin to take a pro team (three or four laps) and begin to make a knot an actual node but being careful to keep the spool of wire and always pull the knot using only the thread of the plume. Without the first second
ecccccc nodes always following the pace of the pen and dell'arotolamento ESPECIALLY BY THE NODES monotonous (I'll explain if you start to make the node do for example with the initial thread spool and pull the wire and make the Spennacchio node passing under the wire of the next Spennacchio nodi SEMPRE SOTTO deveno passare)dicevo prima della parentesi fai i nodi tutti uguali nello stesso modo vedrai che formerai un elicoidale sembrerà strano ma si forma una bella chiocciolina finale.
Poi se ti piace fare il finale (oltre alla chiocciolina) vedi da prima foto della penna rosa con scritta amore vedi il finale è fatto con il filo del rocchetto girato intorno a tutti i spennacchi per i giri e la lunghezza che ti piace, poi prendi un filo dentro al mazzetto e gli fai un doppio triplo nodo per sicurezza prendi ancora un altro filo e fai altri due o tre nodi.
Amici del forum siamo arrivati alla fine della penna spero di essermi spiegato al meglio Io ho fatto il possibile per trasmettervi quello che sapevo.
se avete dei problemi Io I answer via the forum.
explaining how to do the pen was covered like a blast from the past, these experiences never forget.
Surely you will find some difficulty at the beginning but
not give up a dream just because you think it will take too long to realize it, time will pass anyway.
hello to everyone and good evening
Paul thanks Paul.
On this last part I guess I have to think more, but I'm sure that with your help I'll manage.
I agree with you: Do not give up on a dream.


 This
This 


